Measuring a Box in Perspective
5jul10 revised 10ju10\begin{document} \maketitle
 \section{Introduction}
This exercise tests that you have mastered the concepts in the lesson on
measuring a rectangular box in 3 point perspective. By measuring we mean
to determine the relative proportions of the sides to each other. It is
not possible to measure actual distances in a perspective picture
unless there is also a scale visible in it.
Thus a cube has proportions 1:1:1, while a box with proportions 2.5:3:5
would be one with the longest side twice the length of the shortest, and
the third side 3/5 as long as the longest side.
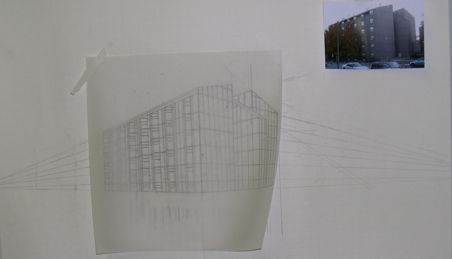
A practical application of this process would come at the start of a project
to redraw a birds-eye view of a building, given a photograph of it. The
first step would be to determine the proportions of the parts of the
building. The second step would be to use such measurments to produce the
plan and elevation of the building. And the final step would be to use
these orthographics views to redraw the building from a different viewpoint.
In order to do this, one has to be able to solve this problem
\subsection{Clarification}
Student Kirsten Clemens offered this supplementary comment:
After much talking out loud, I finally figured out the solution to my conceptualization problem which I am now posting in case anyone else had the same trouble. It really should not have been difficult, but I was having difficulties with the multiple uses of side (aka, side of the box, or side of the rectangle). This is why I was not fully understanding "side ratio;" I needed it to say the ratio of the lengths of a side of the box. The shorthand, more vague description made it hard for me to grasp rapidly. I finally had to label all of the sides of the box to understand that the ratio is really referring to length x width x height of the box (thinking volume to help me remember). I was confused because I was trying to keep these lengths paired with a particular side of the box since the sides were referred to so often in the questions. I need to think of them as a ratio of edges, not of sides. Hopefully, this can help someone else. Sorry if this seems overly simple for others, but for some reason the concept really threw me even though I could still create the constructions.
\subsection{Measuring a Box}
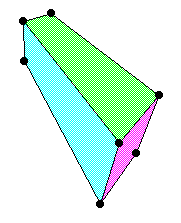
Given this box in 3-point perspective, find the proportions of its sides.
\section{Introduction}
This exercise tests that you have mastered the concepts in the lesson on
measuring a rectangular box in 3 point perspective. By measuring we mean
to determine the relative proportions of the sides to each other. It is
not possible to measure actual distances in a perspective picture
unless there is also a scale visible in it.
Thus a cube has proportions 1:1:1, while a box with proportions 2.5:3:5
would be one with the longest side twice the length of the shortest, and
the third side 3/5 as long as the longest side.
A practical application of this process would come at the start of a project
to redraw a birds-eye view of a building, given a photograph of it. The
first step would be to determine the proportions of the parts of the
building. The second step would be to use such measurments to produce the
plan and elevation of the building. And the final step would be to use
these orthographics views to redraw the building from a different viewpoint.
In order to do this, one has to be able to solve this problem
\subsection{Clarification}
Student Kirsten Clemens offered this supplementary comment:
After much talking out loud, I finally figured out the solution to my conceptualization problem which I am now posting in case anyone else had the same trouble. It really should not have been difficult, but I was having difficulties with the multiple uses of side (aka, side of the box, or side of the rectangle). This is why I was not fully understanding "side ratio;" I needed it to say the ratio of the lengths of a side of the box. The shorthand, more vague description made it hard for me to grasp rapidly. I finally had to label all of the sides of the box to understand that the ratio is really referring to length x width x height of the box (thinking volume to help me remember). I was confused because I was trying to keep these lengths paired with a particular side of the box since the sides were referred to so often in the questions. I need to think of them as a ratio of edges, not of sides. Hopefully, this can help someone else. Sorry if this seems overly simple for others, but for some reason the concept really threw me even though I could still create the constructions.
\subsection{Measuring a Box}
Given this box in 3-point perspective, find the proportions of its sides.
 \subsection{Solution with Ruler and Compass}
With ruler-and-compass, this becomes a straight forward (perhaps tedious)
application of the lesson P7 on measuring a box. Because this particular
box is the one constructed in KSEG and its .seg file is provided, the
ruler-and-compass component of the present exercise can be checked that it
is done correctly, as you do it. However, to complete this exercise you would
have to print out the picture, and scan your construction. You may not be able
to do this in the coming week. See below.
\subsection{Solution with KSEG}
It is, at present, \textbf{not possible} to assign
this problem for online study. The
reason is that it is impossible to upload a figure into KSEG. If it were,
you would proceed as with ruler-and-compass, only more easily, because
when something coincides you just wiggle the unwanted coincidence out of the way.
Since the purpose of assigned exercises is to learn the geometry, and not just
to repeat a recipe on a new problem "just like the one given in class", the
following modification of this exercise for online students is posed as follows:
\section{Exercise 6}
Download the KSEG file \texttt{box.seg}
to your computer and open in KSEG.
\subsection{Part 6a}
First, construct a square grid in the horizontal
Thales triangle with vertex $T$ to look like the grid
already drawn for you in the left Thales triangle. See below on how best
to do this.
\subsection{Part 6b}
Now wiggle the given vertices $W,B,E$ which determine the dimensions of the
box. (What do the other givens, at $A,C,F$ do to the figure?) You will next
use this KSEG window to make 3 different screenshots of different
perspective boxes. Take a screen shot of each, label it in Paint, and
submit. (I changed the top west corner of the box to $W$ because the letter
$D$ was duplicated in the original figure.)
\begin{enumerate}
\item Box A shall have a square top (green), and side ratio of 4:1, where the
height is four times as long as the base. Into your .png figure write the dimensions
if the side $AB$ is given to be 15 feet. \\
\item Box B shall have a domino (2:1) top (green) , and side ratio of 4:1. But the
west side (pink) shall have height:base ratio of 4:3. If the initial side $AB$ is
24 feet now (eases the arithmetic!), write the other two dimensions into our .png. \\
\item For Box C upload the KSEG file
called
\texttt{measureboxsmall.seg} to your computer. Unhide all. This will reveal every
construction line ever used to measure this box. Selectively hide and label
parts of this figure to solve the measurment of the original box above. \\
\item If you have the capacity to scan your ruler-and-compass construction
solving the same problem by hand, include this in your package. Otherwise
submit this construction, done by hand, in your journal at the end of the
term.
\end{enumerate}
\textbf{
All four figures should be zipped into a single file before uploading it to
Classcomm.}
\section{Hints}
\subsection{Screenshots}
On a mac, press \texttt{command+shift+4} and open a marquee over the section
of your desktop you wish to make a .png from. Release. Your figure is labelled
\texttt{Picture 1.png}.
On a pc, click on the window you plan to make a screen shot of. Then presss
\texttt{Alt+PrtScn}, which copies a picture into some buffer. Then paste this
into \texttt{Paint} and edit/save.
\subsection{Tiling a floor}
Choose a vector for the translation of the first tile (tail then tip). Then
the translation button in the palette.
A yellow arrow will appear to indicate the translation you have
currently chosen. Now choose the figure to translate (all or part of the given
square tile, experiment!). Withe \texttt{KSEG Toolbar > Transform > Translate}
lay 2 or 3 more tiles. (You may need to reduce the original tile by pushing the
diagonal corner towards $T$.)
Next, choose another translation vector. With it, you can tile the floor with
a whole row of tiles at a time!
\subsection{Brief recipe the ruler-and-compass option.}
The given box will available online on S5. You may use either print the
.pdf on paper and work with ruler and compass. Or you may transfer it
into a KSEG construction, carefull not to change any lengths or
angles of the figure. Either way, these are the steps:
\begin{itemize}
\item Find the three vanishing points, the perspective frame with the
Thales triangles and the eyepoint \\
\item Then determine the three diagonal vanishing points and their
orthographic counterparts in the Thales triangles. \\
\item Now estimate the proportions. Note, for this you need only two
Thales triangles. The third is there to check your work and make the
estimates more accurate. \\
\end{itemize}
\end{document}
\subsection{Solution with Ruler and Compass}
With ruler-and-compass, this becomes a straight forward (perhaps tedious)
application of the lesson P7 on measuring a box. Because this particular
box is the one constructed in KSEG and its .seg file is provided, the
ruler-and-compass component of the present exercise can be checked that it
is done correctly, as you do it. However, to complete this exercise you would
have to print out the picture, and scan your construction. You may not be able
to do this in the coming week. See below.
\subsection{Solution with KSEG}
It is, at present, \textbf{not possible} to assign
this problem for online study. The
reason is that it is impossible to upload a figure into KSEG. If it were,
you would proceed as with ruler-and-compass, only more easily, because
when something coincides you just wiggle the unwanted coincidence out of the way.
Since the purpose of assigned exercises is to learn the geometry, and not just
to repeat a recipe on a new problem "just like the one given in class", the
following modification of this exercise for online students is posed as follows:
\section{Exercise 6}
Download the KSEG file \texttt{box.seg}
to your computer and open in KSEG.
\subsection{Part 6a}
First, construct a square grid in the horizontal
Thales triangle with vertex $T$ to look like the grid
already drawn for you in the left Thales triangle. See below on how best
to do this.
\subsection{Part 6b}
Now wiggle the given vertices $W,B,E$ which determine the dimensions of the
box. (What do the other givens, at $A,C,F$ do to the figure?) You will next
use this KSEG window to make 3 different screenshots of different
perspective boxes. Take a screen shot of each, label it in Paint, and
submit. (I changed the top west corner of the box to $W$ because the letter
$D$ was duplicated in the original figure.)
\begin{enumerate}
\item Box A shall have a square top (green), and side ratio of 4:1, where the
height is four times as long as the base. Into your .png figure write the dimensions
if the side $AB$ is given to be 15 feet. \\
\item Box B shall have a domino (2:1) top (green) , and side ratio of 4:1. But the
west side (pink) shall have height:base ratio of 4:3. If the initial side $AB$ is
24 feet now (eases the arithmetic!), write the other two dimensions into our .png. \\
\item For Box C upload the KSEG file
called
\texttt{measureboxsmall.seg} to your computer. Unhide all. This will reveal every
construction line ever used to measure this box. Selectively hide and label
parts of this figure to solve the measurment of the original box above. \\
\item If you have the capacity to scan your ruler-and-compass construction
solving the same problem by hand, include this in your package. Otherwise
submit this construction, done by hand, in your journal at the end of the
term.
\end{enumerate}
\textbf{
All four figures should be zipped into a single file before uploading it to
Classcomm.}
\section{Hints}
\subsection{Screenshots}
On a mac, press \texttt{command+shift+4} and open a marquee over the section
of your desktop you wish to make a .png from. Release. Your figure is labelled
\texttt{Picture 1.png}.
On a pc, click on the window you plan to make a screen shot of. Then presss
\texttt{Alt+PrtScn}, which copies a picture into some buffer. Then paste this
into \texttt{Paint} and edit/save.
\subsection{Tiling a floor}
Choose a vector for the translation of the first tile (tail then tip). Then
the translation button in the palette.
A yellow arrow will appear to indicate the translation you have
currently chosen. Now choose the figure to translate (all or part of the given
square tile, experiment!). Withe \texttt{KSEG Toolbar > Transform > Translate}
lay 2 or 3 more tiles. (You may need to reduce the original tile by pushing the
diagonal corner towards $T$.)
Next, choose another translation vector. With it, you can tile the floor with
a whole row of tiles at a time!
\subsection{Brief recipe the ruler-and-compass option.}
The given box will available online on S5. You may use either print the
.pdf on paper and work with ruler and compass. Or you may transfer it
into a KSEG construction, carefull not to change any lengths or
angles of the figure. Either way, these are the steps:
\begin{itemize}
\item Find the three vanishing points, the perspective frame with the
Thales triangles and the eyepoint \\
\item Then determine the three diagonal vanishing points and their
orthographic counterparts in the Thales triangles. \\
\item Now estimate the proportions. Note, for this you need only two
Thales triangles. The third is there to check your work and make the
estimates more accurate. \\
\end{itemize}
\end{document}